Step-by-Step Guide to iPhone Screen Replacement
Replacing an iPhone screen can seem like a daunting task, but with the right tools and instructions, it’s a manageable DIY project. Whether you’re looking to save money or gain some repair experience, this step-by-step guide will walk you through the entire process of iPhone screen replacement. Follow these detailed instructions to ensure a successful screen replacement.

1. Gather Your Tools and Replacement Parts
Before starting the replacement process, make sure you have all the necessary tools and parts. Using the right tools will make the repair easier and reduce the risk of damaging your iPhone further.
You’ll need:
- Replacement Screen: Purchase a high-quality replacement screen compatible with your iPhone model.
- Tool Kit: Essential tools include a pentalobe screwdriver, Phillips screwdriver, suction cup, plastic prying tools, and tweezers.
- Adhesive: Use adhesive strips or glue to secure the new screen in place.
- Cleaning Supplies: Have cleaning solutions and cloths ready to clean any dust or debris from the internal components.
Where to Buy Tools and Parts
To obtain tools and parts:
- Online Retailers: Websites like Amazon, eBay, and specialized repair shops offer iPhone screen repair kits and tools.
- Local Electronics Stores: Check local stores for immediate access to tools and parts.
- Manufacturer Recommendations: Refer to official recommendations for high-quality parts and tools.
2. Power Down Your iPhone
Turning off your iPhone is a crucial step before starting any repair. This ensures that you avoid electrical hazards and prevent damage to internal components.
Follow these steps:
- Turn Off the Device: Press and hold the power button, then slide to power off.
- Remove Any External Accessories: Take off any cases, screen protectors, or other accessories to access the screen more easily.
Why Powering Down is Important
Powering down:
- Prevents Electrical Shorts: Ensures that no electrical components are active during the repair.
- Avoids Data Loss: Reduces the risk of data corruption or loss during the repair process.
3. Remove the Screws Near the Screen
Removing screws is a crucial step to access the internal components of your iPhone. These screws are typically located around the screen’s edge and must be removed carefully to avoid damaging the device.
Here’s how to do it:
- Use a Pentalobe Screwdriver: Remove the two pentalobe screws located near the bottom of the screen.
- Keep Screws Organized: Place screws in a small container to avoid losing them.
Tips for Removing Screws
To ensure a smooth process:
- Use Proper Tools: Ensure that you use the correct size and type of screwdriver to avoid stripping the screws.
- Work in a Clean Area: Perform the repair in a clean, well-lit area to avoid losing small parts.
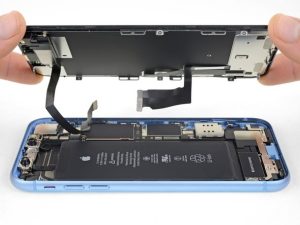
4. Separate the Screen from the iPhone Body
Carefully separating the screen from the iPhone body is a delicate task. Use the right tools to avoid damaging the internal components or the screen itself.
Here’s how to proceed:
- Use a Suction Cup: Attach a suction cup near the bottom of the screen and gently pull to create a small gap.
- Insert a Plastic Pry Tool: Carefully insert a plastic prying tool into the gap to loosen the screen from the body.
- Work Slowly: Gradually work your way around the screen to release it from any adhesive without damaging internal connectors.
Best Practices for Screen Separation
To avoid damaging your iPhone:
- Be Gentle: Apply gentle pressure to avoid cracking or breaking the screen.
- Don’t Rush: Take your time to carefully separate the screen and prevent any mishaps.
5. Disconnect the Battery and Screen Connectors
Disconnecting the battery and screen connectors is crucial for safely replacing the screen. This step prevents electrical shorts and allows you to remove the damaged screen.
Follow these steps:
- Locate Connectors: Find the connectors for the battery and screen, which are usually secured by metal brackets.
- Remove Metal Brackets: Use a Phillips screwdriver to remove screws securing the metal brackets over the connectors.
- Disconnect Connectors: Gently disconnect the battery and screen connectors using tweezers or your fingers.
Tips for Disconnecting Connectors
To avoid damage:
- Handle with Care: Avoid pulling on cables or connectors; gently lift them to disconnect.
- Keep Track of Brackets: Keep metal brackets and screws organized to ensure you can reassemble them correctly.
6. Replace the Screen
Replacing the screen involves installing the new screen and reconnecting all components. Ensure that you use a high-quality replacement screen to match the original specifications.
Here’s how to replace the screen:
- Position the New Screen: Align the new screen with the iPhone body and gently press it into place.
- Reconnect the Connectors: Reattach the battery and screen connectors, ensuring they are securely connected.
- Reattach Metal Brackets: Use a Phillips screwdriver to secure the metal brackets over the connectors.
- Apply Adhesive: Use adhesive strips or glue to secure the new screen in place, ensuring a tight seal.
Ensuring Proper Screen Installation
To ensure proper installation:
- Check Alignment: Ensure that the screen is properly aligned and fits snugly against the iPhone body.
- Test Functionality: Test the touchscreen and display functions before reassembling the device.
7. Reassemble the iPhone
Reassembling the iPhone involves securing the screen and putting everything back in place. Follow these steps to complete the repair.
Here’s how to reassemble:
- Align the Screen: Carefully align the screen with the iPhone body and press it into place.
- Reinsert Screws: Use the pentalobe screwdriver to reinsert the screws near the bottom of the screen.
- Power On the Device: Turn on your iPhone and test the new screen to ensure everything is functioning correctly.
Final Checks and Testing
To ensure everything is in order:
- Verify Screen Functions: Check the touchscreen responsiveness, display clarity, and other screen functions.
- Inspect for Gaps: Ensure there are no gaps between the screen and iPhone body.
Conclusion
Replacing an iPhone screen requires careful attention to detail and the right tools. By following this step-by-step guide, you can successfully replace your iPhone screen and restore your device to optimal condition. Remember to handle all components with care, use high-quality replacement parts, and take your time to ensure a successful repair. If you encounter any difficulties or are unsure about any step, consider seeking professional assistance to avoid further damage to your device.


